How do I partition the first OS disk for macOS Sonoma 14?

HKPhysicist

Member
AMD OS X Member
Oct 15, 2023
52
8
8
CPU:
AMD Ryzen 5 5600H
Hello Friends,
I have already ordered a Ryzen 5 5600H mini PC. I begin to take note about the installation procedure.

I plan to use SystemRescue tool to partition my Ryzentosh primary OS disk.
  • So how should I partition the bootable OS disk?
  • Is 512MB enough for the EFI partition?
  • How about the macOS Recovery partition?

Thanks for your valuable opinions. :)
 
200MB is sufficient for the EFI partition. It must be the first partition on the drive and hidden from normal use, i.e. not mounted by the OS.
700MB is sufficient for the macOS Recovery partition. This is usually the last partition on the macOS drive. This partition is also hidden during normal usage.

Why are you using a third party app to format the macOS drive? When you get to the Apple macOS Installation wizard you will have access to Disk Utility, which you can use to format/erase the OS drive.
But I must copy all my customised EFI files from my installation USB stick to the target OS disk EFI partition manually. Otherwise, the primary OS disk won't boot after I have removed the USB installation stick.
Am I right? :rolleyes:
 
When you Erase the target macOS drive in Disk Utility, you need to select APFS and GUID as the options. This will automatically create a macOS drive with both an EFI folder and an APFS Container, with a Volume for macOS to be installed on. Plus a number of other HIDDEN partitions. This is the standard setting for installing macOS. You need to to nothing more in respect of formatting the drive and creating partitions or volumes.

As part of the macOS Installation a Recovery partition will automatically be created on the drive, at the end in the free space taken from the main macOS APFS Volume.

You do not need to create any partitions, Disk Utility will do it for you. What Disk Utility doesn't create the macOS installer will.

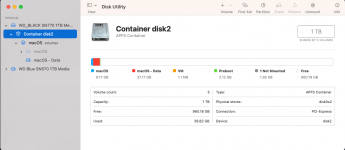
Here is a view of my macOS drive (1TB WD SN770) in Disk Utility it shows the size and number of partitions created on the drive, all done automatically from the above steps.

Screenshot 2023-10-25 at 19.25.55.png Disk Utility view of main APFS Container with 5 volumes/partitions shown.

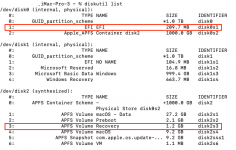
Here is a view of the drives in my iMacPro 3 system, containing two WD 1TB NVME drives. One containing macOS Ventura, the other Windows 11.

Screenshot 2023-10-25 at 19.28.36.png Terminal > diskutil > list command used to display all disks/volumes in the system.

The macOS drive is shown in two parts.
The first part is the main APFS Container - disk0. This includes the hidden/unmounted EFI partition disk0s1.
The second part - disk2 contains the Volumes within the container. As you can see one of the Volumes (disk2s3) is named Recovery. This is the macOS recovery volume/partition.
 
  • Wow
Reactions: HKPhysicist
No, it is very simple when you use a separate drive for macOS. Which Apple expect to be the case in their systems.

When you get to the Apple installation Wizard, all you need to do is this:
  1. Open Disk Utility.
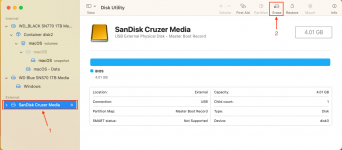
  2. Select the drive you plan to install macOS on, in the righthand navigation bar.
    • Screenshot 2023-10-28 at 22.58.54.png Disk Utility - USB pen drive used as drive to be erased in this example
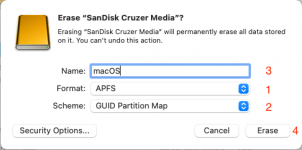
  3. Select 'Erase' from the top row of icons,
    1. Select Format = APFS
    2. Select Scheme= GUID Partition Map
    3. Enter a name for your drive, i.e. 'macOS' or something similar.
    4. Select 'Erase' button
      • Screenshot 2023-10-28 at 22.59.19.png Erase selection dialog box with options numbered to match information listed above.
  4. When you select the 'Erase' button the drive will be erased and reformatted to the settings specified.
    1. So make sure you selected the correct drive as everything will be lost on the drive.
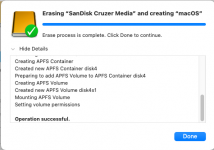
    2. Screenshot 2023-10-28 at 23.11.47.png Erase process completed,
  5. Select 'Done' button.
  6. Exit Disk Utility once the process has completed.
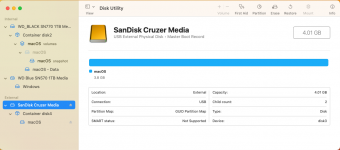
    1. Screenshot 2023-10-28 at 23.12.16.png Newly Erased/formatted drive now shows as APFS formatted drive.
Now when you start the Installation process all you need do is select the drive named 'macOS', or whatever you named your drive, as the location for your macOS installation. Simple!

Only gets messy when you want to dual boot Windows & macOS, or triple boot Windows, Linux & macOS on the same drive.
 
  • Like
Reactions: HKPhysicist
more complicated than Windows or even Linux. :unsure:
n case it helps, I explain what I do...
1.- I always have a live usb with linux mint
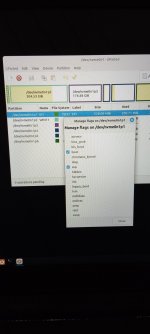
2.- With gparted I make the partitions I need, one of 512 on fat 32 and I name it EFI , and in the menaje flags I point to boot and esp
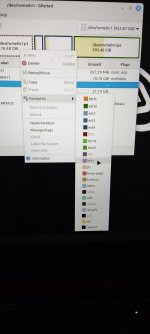
3.- then the partition where I will install the OS, I name it as MacintoshHD and format it as +hfs
4..- and that's it. When I start the installer, with the disk utility I look for the MacintoshHD partition and I click delete with APFS (or whatever), I exit, and I start the installation.
5..- At the end of the installation, if I have not yet copied EFI to the corresponding partition, I open with MINT and copy the boot folder (EFI)
 

Attachments

  • gparted.jpg
    gparted.jpg
    948.7 KB · Views: 1
  • gparted0.jpg
    gparted0.jpg
    929.3 KB · Views: 1
  • particiónEFI.jpg
    particiónEFI.jpg
    1.2 MB · Views: 1
  • format hfs.jpg
    format hfs.jpg
    683 KB · Views: 2
  AdBlock Detected
Sure, ad-blocking software does a great job at blocking ads, but it also blocks some useful and important features of our website. For the best possible site experience please take a moment to disable your AdBlocker.