Solved macOS Sequoia 15.7.1 on GIGABYTE B450M DS3H, AMD Ryzen 5 1600, AMD Radeon RX 580 8 GB

ego23

New member
AMD OS X Member
Oct 20, 2025
2
1
3
CPU:
Ryzen 1600
Just started with Hackintoshing yesterday and had success with OpenCore. Overall time spent ~ 8 hours.

Specs:
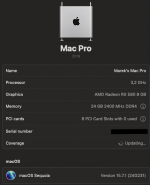
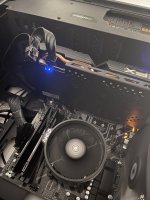
  • GIGABYTE B450M DS3H
  • AMD Ryzen 5 1600 (12nm)
  • EVGA 600 BQ
  • AMD Radeon RX 580 8 GB
  • 24 GB 2400 MHz DDR4
  • Samsung 860 EVO 500 GB

Screenshot 2025-10-24 at 14.46.34.pngIMG_5172.JPG

Fun part (the struggle):
  • ethernet was not working (which was needed for installation from restore image) problem was 50% latest version of kext for realtek card not working, I also added at the same time boot arg thats where are other 50%, I found some older version from some forum (EFI will be attached) which I run now
  • other than that after installation I needed to do en0 fix to make "built in" flag enabled and that unblocked my problem with login with apple id -> apple store issue
I followed this youtube video but used common sense and was careful when configuring plist
Most of the time I fall back to OpenCore installation guide for up to date info.
For SSDTs I used the one prebuilt.

My goal is to use this machine to finish of building iOS app and make some screenshots from simulator for app store submission and then look around and think about if switch to Apple would be worth the money. Maybe will tinker more and enable most of the functionality ...

My question to community: I had on this machine installed Ubuntu Server where I worked with local LLMs, had there installed print server so I could print over Wi-Fi to my old HP LaserJet printer, overall experimenting with it in my VPN so I had access to it through SSH from my iPhone anywhere I was, I really liked the centralized powerful machine still with me, is possible to do similar stuff with such Hackintosh ?

PS: EFI in attachment cleaned of serial number, if anyone has time to review it by eye I would appreciate so I know if I did some "no no"
 

Attachments

  • Like
Reactions: Edhawk
Congratulations on getting your Hack up and running Sequoia.

Your EFI is a good setup for installation of macOS on your system, but should and can be improved going forward.

These are the most logical elements you should undertake/complete post install to better your macOS experience.

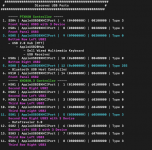
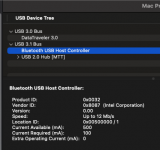
1. Create a custom USBMap.kext for your setup, using Corpnewt's USBMap script. This is one of if not the most important parts of getting your Hack working at its best. Failure to undertake this action or get it wrong and you will probably be plagued by Sleep/Wake and shutdown issues.


2. Generate a few Custom SSDT's using your system ACPI tables and Corpnewt's SSDTTime script.


SSDTTime Options 1, 2, 4, 5, A & C are the ones I would recommend you generate for your system.

Screenshot 2025-10-24 at 19.37.36.png SSDTime Main Window with options shown.

Below is a link to a guide for generating the custom SSDT's.


3. Add RestrictEvents.kext to your setup, along with the NVRAM > Add & > Delete entries listed/shown in the screenshot below:

Screenshot 2025-10-24 at 19.35.43.png NVRAM section from revised EFI's config.plist.


4. Add OpenCanopy.efi and a populated /EFI/OC/Resources folder to your OC setup. So you see the OC GUI in place of the text based Picker List when you boot in to OpenCore.

Change a few items in the Misc section of the config.plist, as shown below.

Screenshot 2025-10-24 at 19.57.02.png Misc section of config.plist from revised EFI
  • LauncherOption - Full - adds an entry to the system Bios named OpenCore, which you can select as your first boot option.
  • PickerMode - External - adds the GUI boot screen to OpenCore.
  • DisableWatchDog - True - is one of the options you missed from Dortania's guide.
  • AllowSetDefault - True - allows you to select a boot icon from the OC boot screen as your default boot drive.
    • Simple highlight the boot icon you want to select as your default boot option,
    • Press and hold the Control key while simultaneously pressing the Enter key and
    • The icon below the drive image will change to a circular arrow. This indicates that the icon has been set as the default boot option so it will be selected automatically if the OC timeout expires.
5. Remove HfsPlus.efi from your /EFI/OC/Tools folder, this should only be present in the Drivers folder.

6. Clean up your OC config.plist, removing any unused and unnecessary entries but leaving the plist sections in the correct order, incorrect or unused Boot Arguments being a common issue.

As a comparison I have attached a screenshot showing your current EFI folder contents and a revised EFI folder contents taking in to account some of the elements listed above.

Screenshot 2025-10-24 at 19.09.09.png Current EFI folder contents

Screenshot 2025-10-24 at 19.13.13.png Revised EFI folder contents

There isn't a huge difference between the two folders currently, but after you have undertaken options 1 and 2 above and added the respective kexts and custom SSDT't there would be a bigger difference between them.

A copy of the revised and cleaned up EFI folder is attached for you to compare against your current OC setup.

If you want to try this revised EFI just make sure you add your Serial Number etc. to the config.plist. You shouldn't need to change anything else in the config.plist.
 

Attachments

Congratulations on getting your Hack up and running Sequoia.

Your EFI is a good setup for installation of macOS on your system, but should and can be improved going forward.

These are the most logical elements you should undertake/complete post install to better your macOS experience.

1. Create a custom USBMap.kext for your setup, using Corpnewt's USBMap script. This is one of if not the most important parts of getting your Hack working at its best. Failure to undertake this action or get it wrong and you will probably be plagued by Sleep/Wake and shutdown issues.


2. Generate a few Custom SSDT's using your system ACPI tables and Corpnewt's SSDTTime script.


SSDTTime Options 1, 2, 4, 5, A & C are the ones I would recommend you generate for your system.

View attachment 18295 SSDTime Main Window with options shown.

Below is a link to a guide for generating the custom SSDT's.


3. Add RestrictEvents.kext to your setup, along with the NVRAM > Add & > Delete entries listed/shown in the screenshot below:

View attachment 18294 NVRAM section from revised EFI's config.plist.


4. Add OpenCanopy.efi and a populated /EFI/OC/Resources folder to your OC setup. So you see the OC GUI in place of the text based Picker List when you boot in to OpenCore.

Change a few items in the Misc section of the config.plist, as shown below.

View attachment 18299 Misc section of config.plist from revised EFI
  • LauncherOption - Full - adds an entry to the system Bios named OpenCore, which you can select as your first boot option.
  • PickerMode - External - adds the GUI boot screen to OpenCore.
  • DisableWatchDog - True - is one of the options you missed from Dortania's guide.
  • AllowSetDefault - True - allows you to select a boot icon from the OC boot screen as your default boot drive.
    • Simple highlight the boot icon you want to select as your default boot option,
    • Press and hold the Control key while simultaneously pressing the Enter key and
    • The icon below the drive image will change to a circular arrow. This indicates that the icon has been set as the default boot option so it will be selected automatically if the OC timeout expires.
5. Remove HfsPlus.efi from your /EFI/OC/Tools folder, this should only be present in the Drivers folder.

6. Clean up your OC config.plist, removing any unused and unnecessary entries but leaving the plist sections in the correct order, incorrect or unused Boot Arguments being a common issue.

As a comparison I have attached a screenshot showing your current EFI folder contents and a revised EFI folder contents taking in to account some of the elements listed above.

View attachment 18296 Current EFI folder contents

View attachment 18297 Revised EFI folder contents

There isn't a huge difference between the two folders currently, but after you have undertaken options 1 and 2 above and added the respective kexts and custom SSDT't there would be a bigger difference between them.

A copy of the revised and cleaned up EFI folder is attached for you to compare against your current OC setup.

If you want to try this revised EFI just make sure you add your Serial Number etc. to the config.plist. You shouldn't need to change anything else in the config.plist.
Thanks for so wide review, or it at least seems for me right now :)

I also have a question regarding updating EFI, etc. because I also moved from not booting from USB therefore not so easy now to just fix the kexts or plist if anything go wrong, is there any procedure for this ? Or when I put the USB and set boot priority from it it will just load mac OS from it ?
 
What you need to do is keep your current Working EFI/USB in a safe and easy to find location. So you can revert back to it if you run into any issues booting your hack.

Copying your OpenCore EFI folder to the EFI partition on your macOS boot drive is normal. You just need to be aware that the EFI partition is hidden from the user by default in macOS and it needs to be ‘Mounted’ in order for any updates to be undertaken.

I tend to do this manually, using an app to mount the partition, manually replacing any kexts and using Corpnewt's ProperTree script to edit the updated OC config.plist. This method isn’t for everyone, as it requires some extra work and knowledge.

A lot of Hack users opt for OCAuxiliaryTools (OCAT) and other graphical apps, as they semi-automate some processes such as updating OpenCore and kexts used in the OC setup. It isn’t fool proof, if you do something wrong the app will not necessarily tell you that what you did was wrong.


Here is a link to an OCAT user guide, which may answer a lot of your questions.

 
  AdBlock Detected
Sure, ad-blocking software does a great job at blocking ads, but it also blocks some useful and important features of our website. For the best possible site experience please take a moment to disable your AdBlocker.