- Joined
- May 21, 2021
- Messages
- 15
I wrote this tutorial to help AMD users create their own version of macOS in VMWare where I believe the system runs more smoothly.
1) First you need to download VMWare from the official website and install it by choosing the free, non-commercial version:
Download Unlocker to patch VMWare:

 mega.nz
After installing VMWare close it.
Extract all the unlocker files into a folder, open the command prompt (terminal) in administrator mode and run "win-install.cmd".
This patch releases the Apple Mac OS X version configuration option in VMWare under Virtual Machine Settings, Options, Apple Mac OS X:
use "macOS 14" when configuring your virtual machine:

2) Also download an ISO of macOS Sonoma (tested):
mega.nz
I believe that other previous macOS versions may work since opencore 0.95 was used in this project. I haven't tested it with others yet.
3) Download a small VMWare disk image file:
This file contains Opencore 0.95 on an EFI partition and should be chosen as a disk image on the SATA 0:0 drive in the VMWare settings. It should always be used that way.
I created a version of this file with 4 cores. But soon I'll post it here with 6 and 8 core. You'll be able to use these even when the system is already installed. Don't worry if your processor has 6 or more cores because it works normally as long as you set the number of colors correctly in VMWare.
In a few installations here VMWare didn't reset automatically and froze during the System Text listing. To resolve this, I simply rebooted manually and let the system continue the process. I don't know why, but if anyone can solve it, I'd appreciate it.
VMWare settings:
1) Memory: 8GB
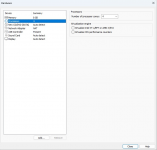
2) Processors: 4 cores (It must be exactly that because Opencore patched to 4 cores)

3) Hard Disk (Sata): macOS_OpencoreBoot.vmdk (SATA 0:0) should always be the first boot drive.

4) Hard Disk 2 (Sata): This drive is where macOS will be installed. Any size you see fit.
5) CD/DVD (SATA): Use ISO image file (Sonoma.iso)

6) USB Controller 3.1. (tested)

7) Network Adapter: Bridged Automatic.
During installation, only erase or format the macOS installation drive you created using Disk Utility. Never do this on the OPENCORE drive (it must remain untouched):


***** In some test installations, the system has crashed or stopped during installation. I don't know why this happens. To solve it, just reset VMWare and let the installation continue normally.
***** When I first got macOS, I had this problem with a white background (wallpaper) in the system background. But you have to go into the macOS settings and click on Wallpaper and then deactivate the Show as screen saver option. Then choose a wallpaper you like.
1) First you need to download VMWare from the official website and install it by choosing the free, non-commercial version:
Download Unlocker to patch VMWare:
11.23 MB file on MEGA
After installing VMWare close it.
Extract all the unlocker files into a folder, open the command prompt (terminal) in administrator mode and run "win-install.cmd".
This patch releases the Apple Mac OS X version configuration option in VMWare under Virtual Machine Settings, Options, Apple Mac OS X:
use "macOS 14" when configuring your virtual machine:
2) Also download an ISO of macOS Sonoma (tested):
13.37 GB file on MEGA
I believe that other previous macOS versions may work since opencore 0.95 was used in this project. I haven't tested it with others yet.
3) Download a small VMWare disk image file:
This file contains Opencore 0.95 on an EFI partition and should be chosen as a disk image on the SATA 0:0 drive in the VMWare settings. It should always be used that way.
I created a version of this file with 4 cores. But soon I'll post it here with 6 and 8 core. You'll be able to use these even when the system is already installed. Don't worry if your processor has 6 or more cores because it works normally as long as you set the number of colors correctly in VMWare.
In a few installations here VMWare didn't reset automatically and froze during the System Text listing. To resolve this, I simply rebooted manually and let the system continue the process. I don't know why, but if anyone can solve it, I'd appreciate it.
VMWare settings:
1) Memory: 8GB
2) Processors: 4 cores (It must be exactly that because Opencore patched to 4 cores)
3) Hard Disk (Sata): macOS_OpencoreBoot.vmdk (SATA 0:0) should always be the first boot drive.
4) Hard Disk 2 (Sata): This drive is where macOS will be installed. Any size you see fit.
5) CD/DVD (SATA): Use ISO image file (Sonoma.iso)
6) USB Controller 3.1. (tested)
7) Network Adapter: Bridged Automatic.
During installation, only erase or format the macOS installation drive you created using Disk Utility. Never do this on the OPENCORE drive (it must remain untouched):
***** In some test installations, the system has crashed or stopped during installation. I don't know why this happens. To solve it, just reset VMWare and let the installation continue normally.
***** When I first got macOS, I had this problem with a white background (wallpaper) in the system background. But you have to go into the macOS settings and click on Wallpaper and then deactivate the Show as screen saver option. Then choose a wallpaper you like.
Attachments
Last edited: